
[번역] VS Code - Tips and Tricks
by Reid
마우스 안쓰고 코딩하기를 실천하기 위해 학습하기 위해 요약 번역해보았습니다. 잘못된 번역은 바로 잡아주시면 고맙겠습니다.
원문: https://code.visualstudio.com/docs/getstarted/tips-and-tricks
Tips and Tricks
Basic
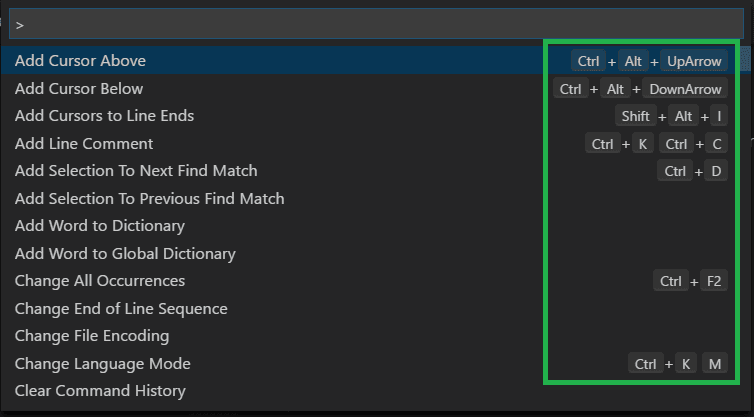
Command Palette
현재 컨텍스트에 맞는 모든 명령어들에 접근 할 수 있음
단축키: ⇧⌘P

Default keyboard shortcuts
검색된 명령어들 오른쪽에 단축키가 표시되니 일단 팔레트로 선택해서 사용하면서 외운다.
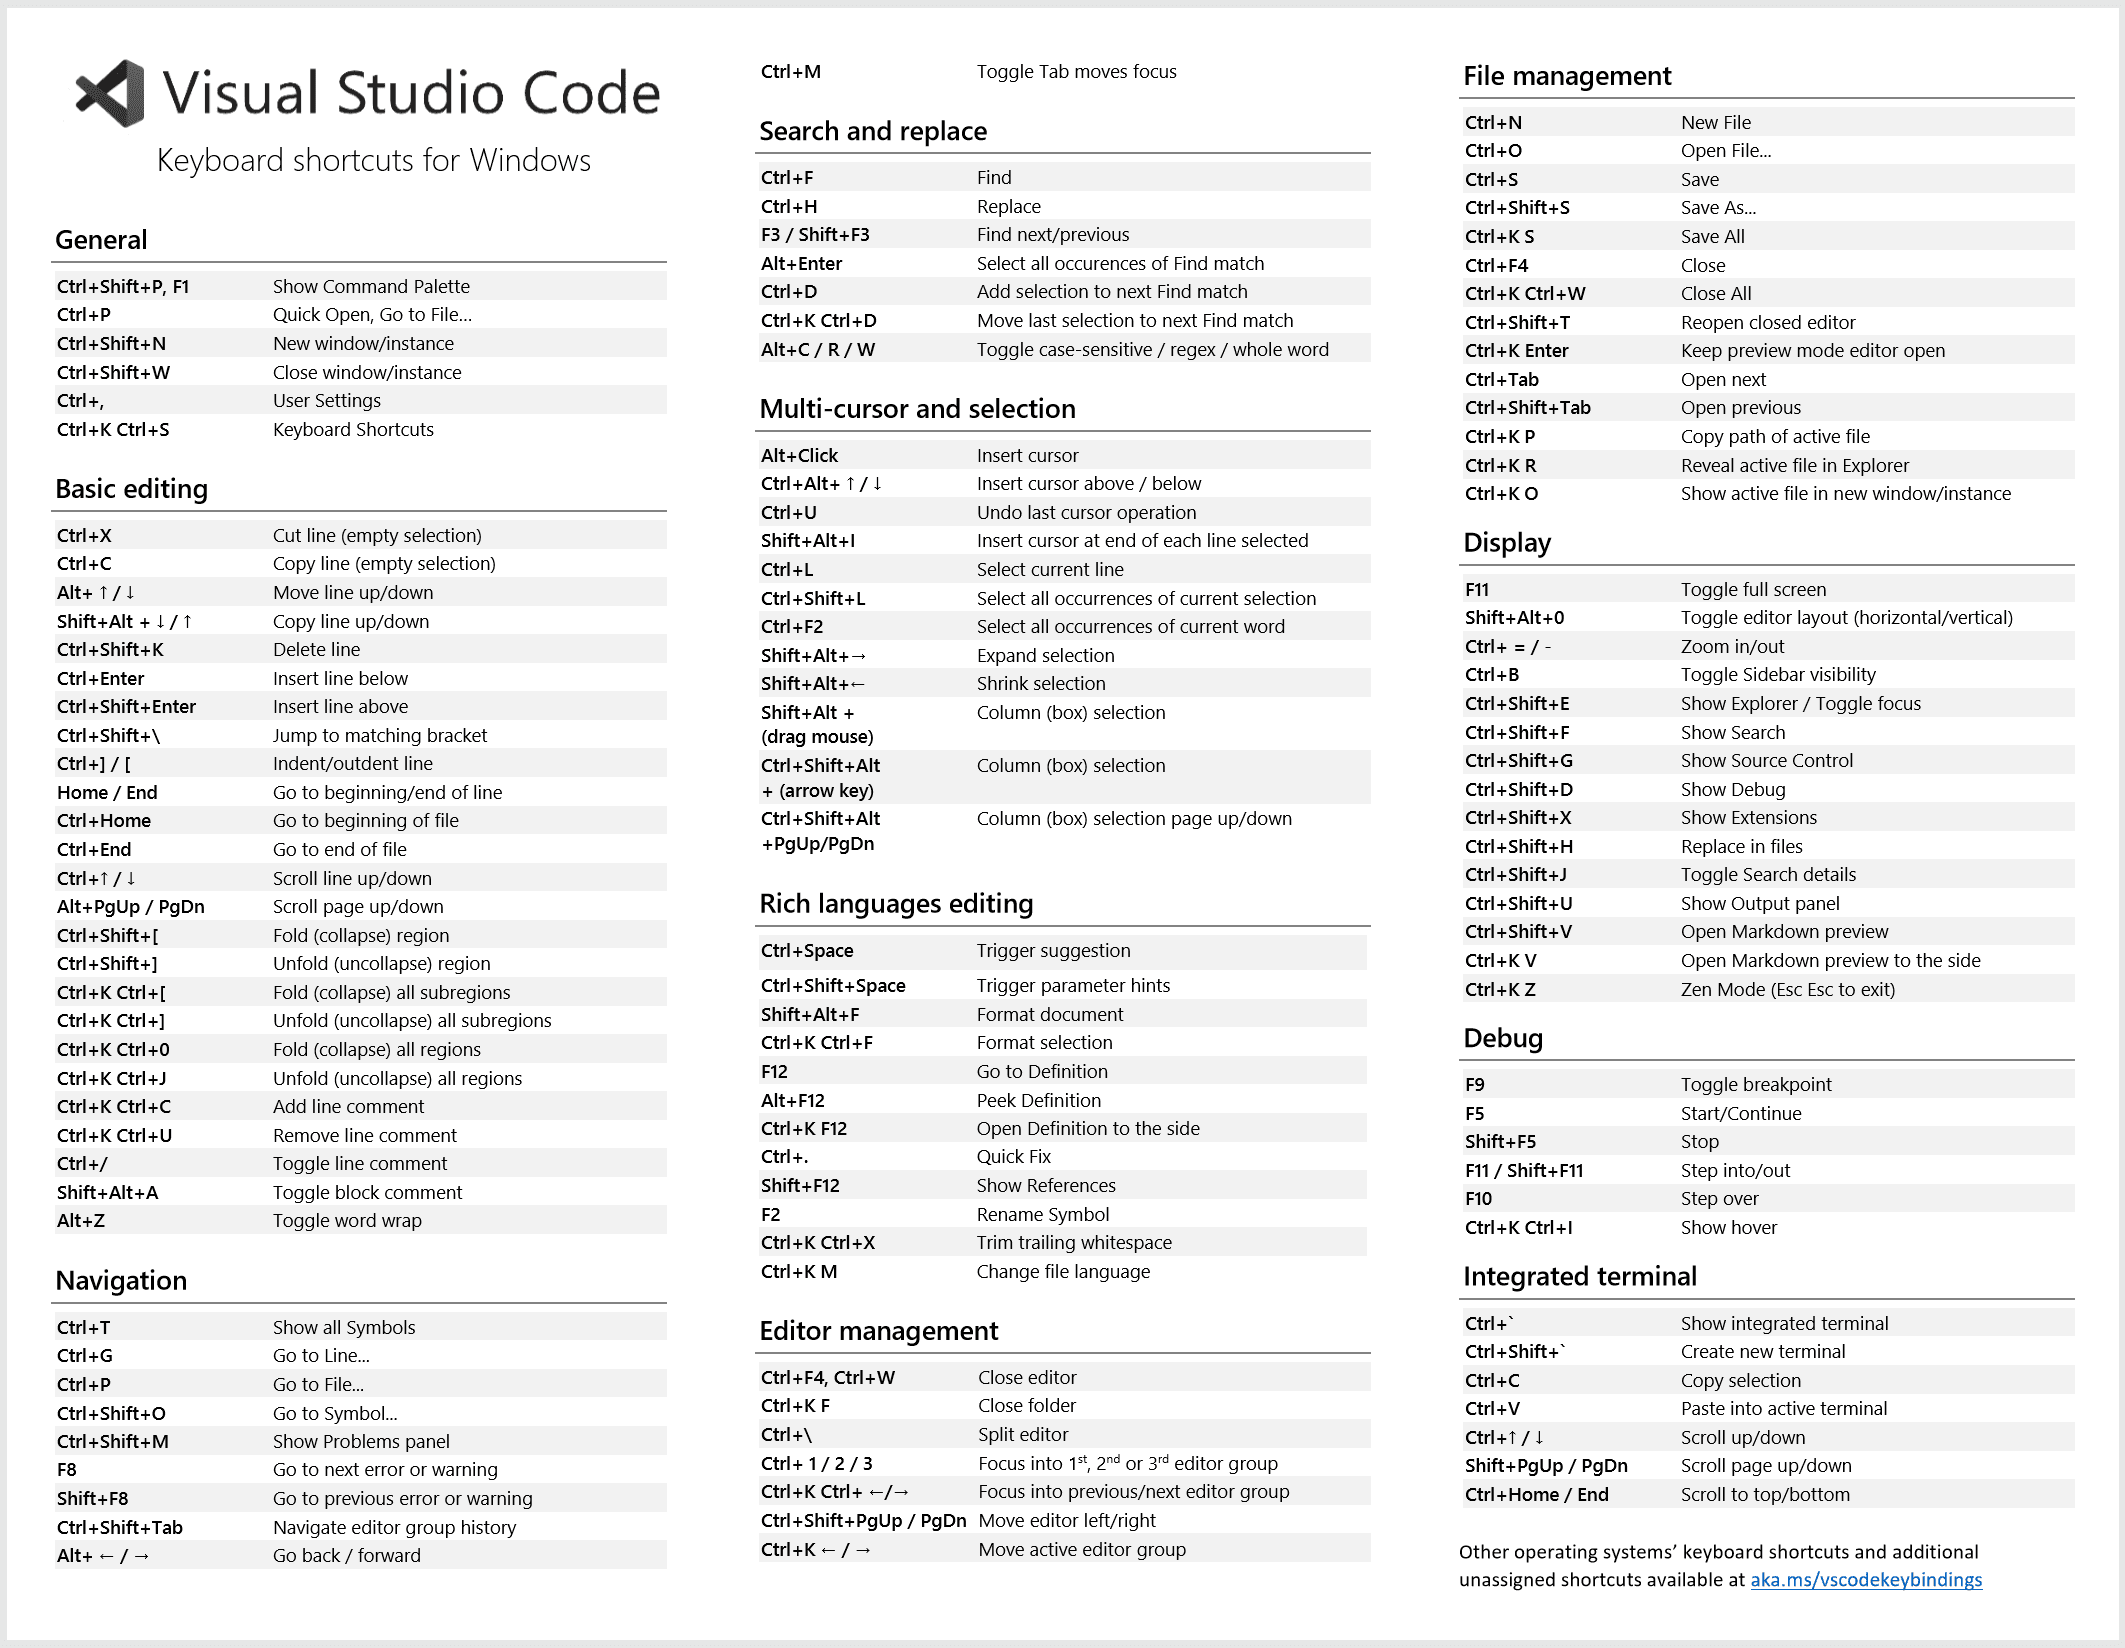
Keyboard reference sheets
다운로드 받아서 프린트하거나 띄워놓고 계속 볼 것 (macOS, Windows, Linux)
Quick Open
?를 입력하면 도움말을 볼 수 있음
이 창에서 모든 것이 시작된다고 생각하면 될 듯. >를 누르면 command pallete, #를 누르면 symbol 검색 등.
단축키: ⌘P

Navigate between recently opened files
Quick open 단축키를 빠르게 여러번 누르면 지난 파일들을 순회 할 수 있다.
Open multiple files from Quick Open
파일 위에서 오른쪽 화살표 키를 누르면 Quick Open 창을 닫지 않고 여러 파일을 열 수 있다.
Command line
일단 CLI에서 ‘code’만 입력하면 VS Code가 실행될 수 있도록 설정
Command Pallete에서 shell command를 입력해서 “Install ‘code’ command in PATH”를 선택하면 설치 됨.
# code를 실행하고 현재 디렉토리를 로드
code .

# 이미 띄워져 있는 최근 창에서 현재 디렉토리를 로드
code -r .
.vscode folder
root 폴더의 .vscode 폴더에 workspace 관련 파일들이 있음. 예를 들어, tasks.json은 태스크 러너 관련, launch.json 파일은 디버거 관련.
Status Bar
Errors and warnings
단축키: ⇧⌘M
F8과 ⇧F8을 누르면 프로젝트의 에러나 경고가 발생한 위치로 빠르게 이동한다.

Change language mode
단축키: ⌘K M

Customization
VS Code로 커스터마이즈 할 수 있는 것들:
- 테마 변경
- 키보드 단축키 변경
- 설정 튜닝
- JSON validation 추가
- snippet 만들기
- extension 설치
Change your theme
단축키: ⌘K ⌘T

파일 아이콘 테마 변경
Keymaps
다른 에디터의 키 설정을 그대로 가져올 수 있음.
Preferences > Keymap Extensions
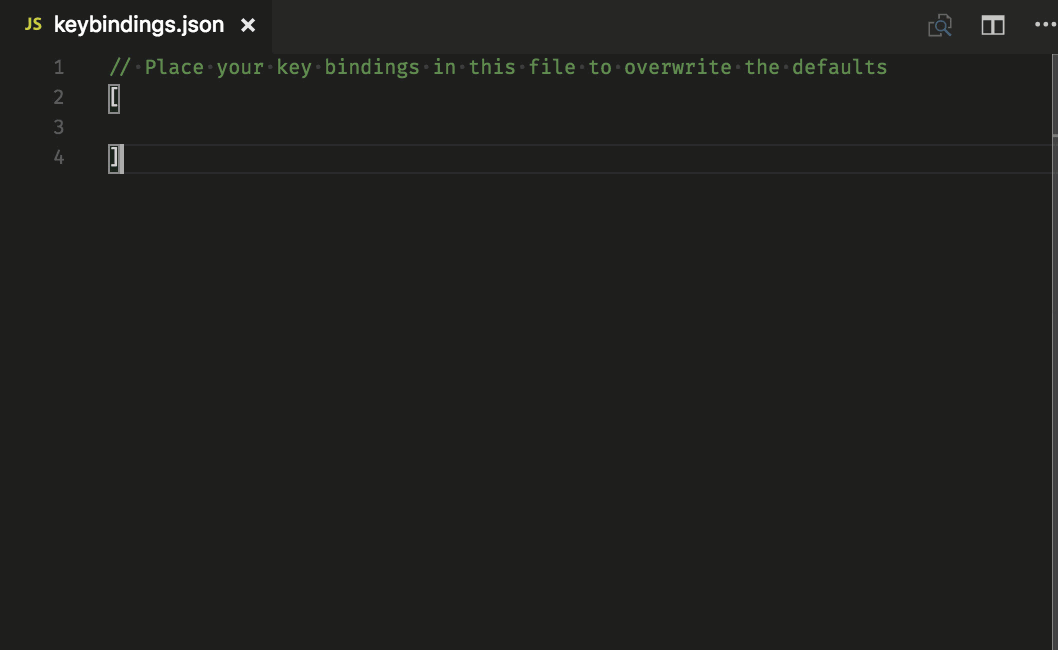
Customize your keyboard shortcuts
단축키: ⌘K ⌘S

keybindings.json 파일에서 직접 자기만의 키 바인딩을 만들 수도 있음
Tune your settings
사용자 설정 파일 settings.json 열기
단축키: ⌘,
paste 할 때 포맷 맞추기
"editor.formatOnPaste": true
폰트 크기 변경
"editor.fontSize": 18
zoom level 변경
"editor.fontSize": 18
폰트 ligatures 설정
"editor.fontFamily": "Fira Code",
"editor.fontLigatures": true
 자동 저장
자동 저장
"files.autoSave": "afterDelay"
저장 할 때 포맷 맞추기
"editor.formatOnSave": true
탭 크기 변경
"editor.tabSize": 4
탭을 스페이스로 할 지
"editor.insertSpaces": true
공백을 렌더링 할 지
"editor.renderWhitespace": "all"
파일/폴더 무시하기
에디터 창에서 이 파일들과 폴더들을 제거합니다.
"files.exclude": {
  "somefolder/": true,
  "somefile": true
}
검색 결과에서 이 파일들과 폴더들을 제거합니다.
"search.exclude": {
  "somefolder/": true,
  "somefile": true
}
그 외 많은 다른 설정들
Language specific settings
특정한 언어만을 위해 따로 설정 할 수 있음.
"[languageid]": {

}

Add JSON validation
settings.json 파일에 자기만의 schema와 validation을 만들 수 있음
"json.schemas": [
  {
    "fileMatch": [
      "/bower.json"
    ],
    "url": "http://json.schemastore.org/bower"
  }
]
자기 workspace에 정의된 schema
"json.schemas": [
  {
    "fileMatch": [
      "/foo.json"
    ],
    "url": "./myschema.json"
  }
]
커스텀 schame
"json.schemas": [
  {
    "fileMatch": [
      "./myconfig"
    ],
    "schema": {
      "type": "object",
      "properties": {
        "name": {
          "type": "string",
          "description": "The name of the entry"
        }
      }
    }
  },
Extensions
단축키: ⇧⌘X
extension 찾기
- VS Code Marketplace 방문
- Extensions 화면에서 검색
- 추천 extension 확인
- awesome-vscode 같은 커뮤니티 extension 목록 참고
Install extensions
Extension 사이드 바의 More Actions (…) 버튼을 눌러 여러가지 방식으로 필터링 시켜 찾는다.

Extension recommendations
이것도 마찬가지

나만의 extension 만들기
Files and folders
Integrated Terminal
단축키: ^`
Auto Save
"files.autoSave": "afterDelay"
Toggle Sidebar
단축키: ⌘B
Zen mode
단축키: ⌘K Z
 Zen 모드는 산만함을 없애주는 전체 화면을 보여줍니다.
 ESC를 두 번 누르면 Zen 모드에서 나갑니다.
Side by side editing
단축키: ⌘\
에디터 창을 모서리로 드래그 앤 드롭을 하는 것 역시 동일한 효과를 내게 됩니다.
Switch between editors
단축키: ⌘1, ⌘2, ⌘3

Move to Explorer window
단축키: ⇧⌘E
Create or open a file
단축키: Ctrl+click (맥에서는 Cmd+click)
소스 코드의 파일 이름 링크위에서 Ctrl+click을 하면 파일이나 이미지를 빠르게 열거나 새 파일을 만들 수 있습니다.

Close the currently opened folder
단축키: ⇧W
Navigation history
Navigation entire history: ^Tab
Navigation back: ^-
Navigation forward: ^⇧-

File associations
자동으로 언어와 연동시켜주지 못하는 파일들을 위해 새로운 언어 연동을 해줌.
"files.association": {
  ".database": "json"
}
Preventing dirty writes
에디터 외부에서 수정 된 파일은 저장되지 못하고, 충돌을 해결해야 함.
Editing hacks
Multi cursor selection
Alt+Click(맥에서는 Option+Click)을 하면 여러 위치가 선택됨.
현재 위치에서 커서를 위, 아래로 설정하려는 단축키는: ⌥⌘↑나 ⌥⌘↓
현재 위치에 선택된 단어와 동일한 모든 곳에 커서를 추가하는 명령은 ⇧⌘L
현재 위치에 선택된 단어와 동일한 곳에 하나씩 커서를 추가하는 명령은 ⌘D
Column (box) selection
블럭 선택 Shift+Alt(맥에서는 Shift+Option)을 하고 마우스로 드래그
Copy line up / down
단축키: ⇧⌥↑나 ⇧⌥↓
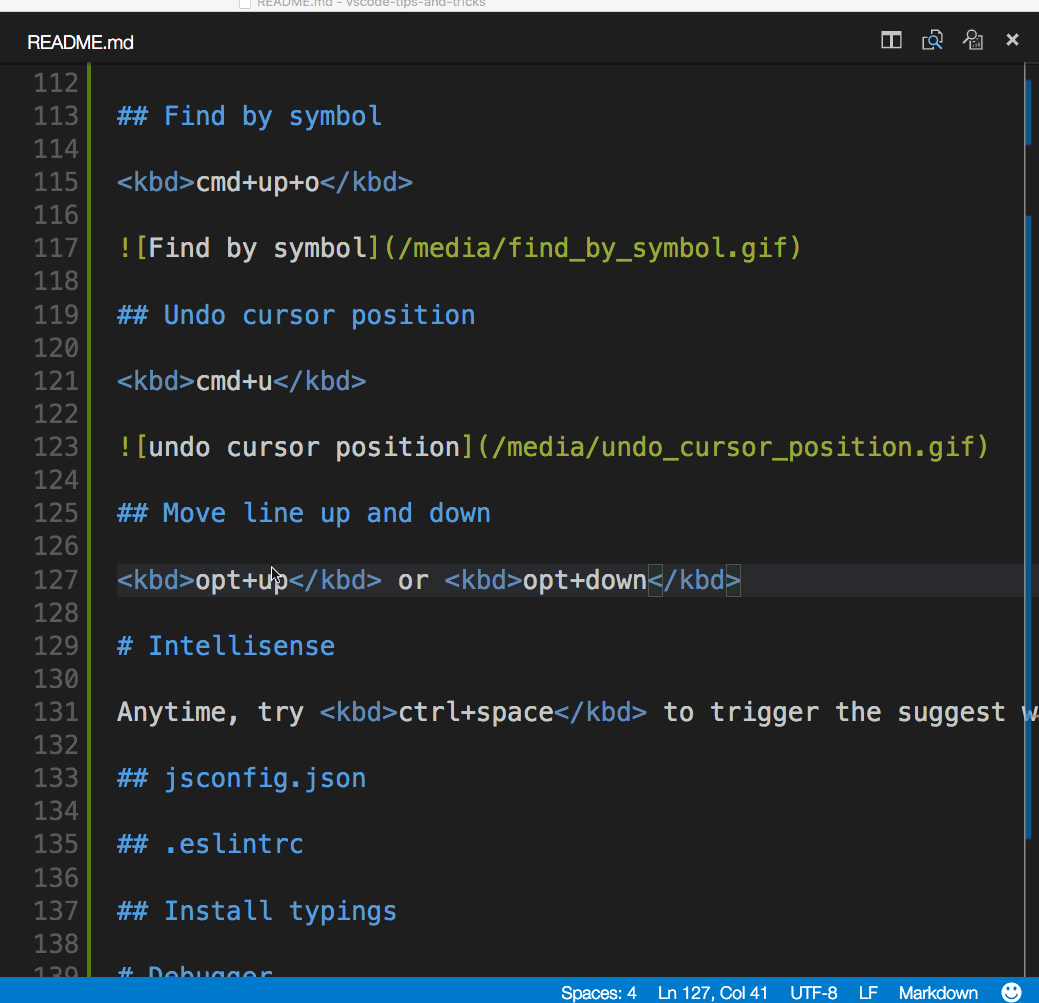
Move line up / down
단축키: ⌥↑나 ⌥↓
Shrink / expand selection
단축키: ⌃⇧⌘←나 ⌃⇧⌘→
Go to Symbol in File
단축키: ⇧⌘O
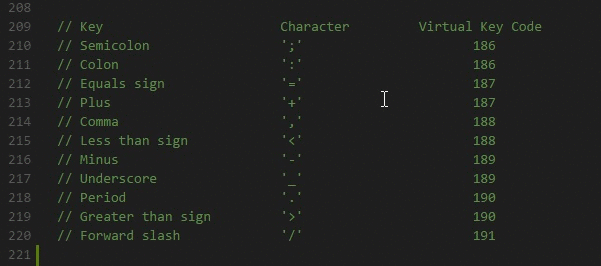
콜론을 추가하면 종류별로 심볼을 그룹지어서 볼 수 있음, @:

Go to Symbol in Workspace
단축키: ⌘T

Navigate to a specific line
단축키: ^G
Undo cursor position
단축키: ⌘U
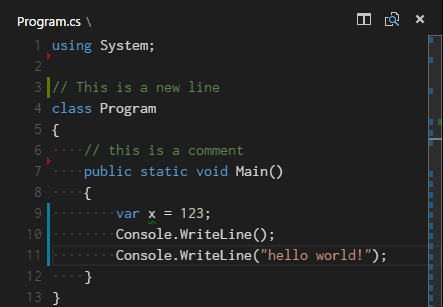
Trim trailing whitespace
단축키: ⌘K ⌘X

Code formatting
단축키: ⌘K ⌘F
전체 문서의 포맷은: ⇧⌥F

Code folding
단축키: ⌥⌘[나 ⌥⌘]
Select current line
단축키: ⌘I
Navigate to beginning and end of file
단축키: ⌘↑나 ⌘↓
Open Markdown preview
단축키: ⇧⌘V

Side by side Markdown edit and preview
마크다운 파일에서 단축키: ⌘K V

IntelliSense
^Space가 띄우는 추천 위젯은 사용 가능한 메소드, 파라메터 힌트, 짧은 도큐먼트를 보여줌.
Peek
심볼을 선택하고 ⇧⌘F12를 누름.

Go to Definition
심볼을 선택하고 F12를 누름. Ctrl+Click(맥에서는 Cmd+Click)

이전 위치로 가려면 Go > Back 명령을 하던지 ^- 단축키를 쓰면 됨.
Find All References
심볼을 선택하고 ⇧F12를 누름.
Rename Symbol
심볼을 선택하고 F2를 누름.

Search and modify
검색 박스에서 Use Regular Expression .*(⌥⌘R) 버튼을 눌러 정규표현식을 활성화시키고 검색을 시킨 후 $1, $2 등을 이용해 바꾸기 작업을 할 수 있음.

.eslintrc.json
ESLint extension을 설치. ESLinkt specification을 활용해 linting 규칙과 옵선을 설정.
ES6 설정 예
{
    "env": {
        "browser": true,
        "commonjs": true,
        "es6": true,
        "node": true
    },
    "parserOptions": {
        "ecmaVersion": 6,
        "sourceType": "module",
        "ecmaFeatures": {
            "jsx": true,
            "classes": true,
            "defaultParams": true
        }
    },
    "rules": {
        "no-const-assign": 1,
        "no-extra-semi": 0,
        "semi": 0,
        "no-fallthrough": 0,
        "no-empty": 0,
        "no-mixed-spaces-and-tabs": 0,
        "no-redeclare": 0,
        "no-this-before-super": 1,
        "no-undef": 1,
        "no-unreachable": 1,
        "no-use-before-define": 0,
        "constructor-super": 1,
        "curly": 0,
        "eqeqeq": 0,
        "func-names": 0,
        "valid-typeof": 1
    }
}
package.json
package.json 파일에 대한 IntelliSense도 지원

Emmet syntax

Snippets
Create custom snippets
File > Preferences > User Snippets (맥에서는 Code > Preferences > User Snippets) 언어를 선택하면 snippet을 생성함. 짧은 키워드를 입력하면 정의된 전체 구문을 작성해주는 기능.
"create component": {
    "prefix": "component",
    "body": [
        "class $1 extends React.Component {",
        "",
        "\trender() {",
        "\t\treturn ($2);",
        "\t}",
        "",
        "}"
    ]
},
Git integration
단축키: ⌃⇧G
Diffs
Source Control 뷰에서 diff를 할 파일 선택
![]()
Side by side
기본이 side by side diff.
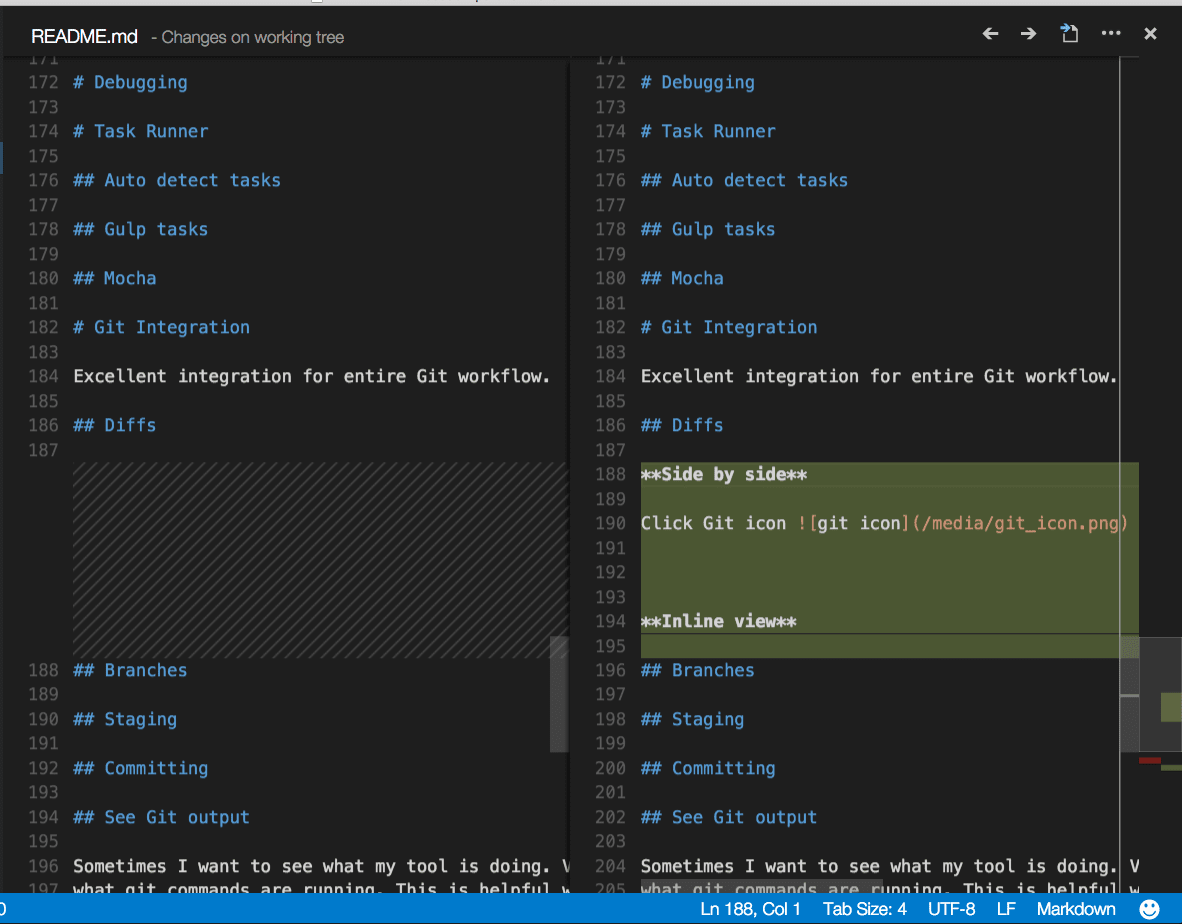
Inline view
More Actions (…) 버튼을 눌러 Switch to Inline View를 선택
Inline view를 선호하면 "diffEditor.renderSideBySide": false로 설정.
Review pane
F7과 ⇧F7로 diff를 unified patch 포맷으로 순회 할 수 있음. 방향키로 라인을 탐색하고 Enter를 눌러 라인을 선택하고 diff 에디터로 돌아올 수 있음.

Edit pending changes
diff 뷰의 변경 대기 중인 코드를 직접 수정
Branches
Status Bar를 통해 쉽게 브랜치 변경
Staging
Stage all
변경 파일 숫자 위를 마우스 호버 하면 버튼이 + 모양으로 바뀌는데 이를 누르면 모든 파일들을 stage 시킴
Stage selected
파일을 선택하고 Command Palette에서 Stage Selected Ranges를 선택해서 파일의 일부를 stage
Undo last commit
More Actions… 메뉴에서 Undo Last Commit를 선택

See Git Output
Toggle Output 명령(⇧⌘U) 화면의 드롭 다운 메뉴에서 Git을 선택
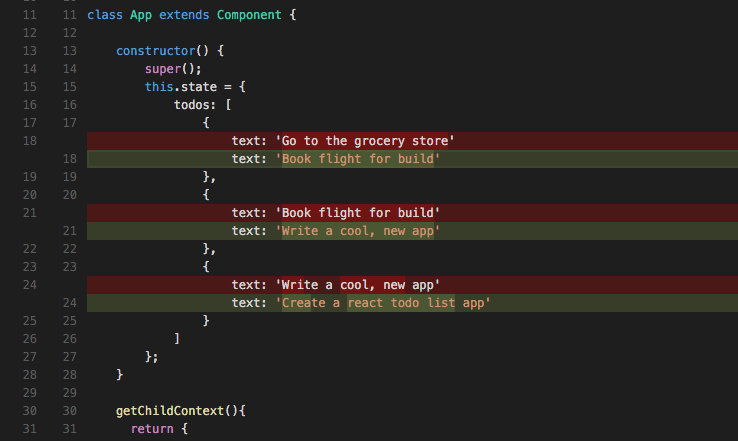
Gutter indicators
- 빨간 삼각형은 지워졌던 라인
- 녹색 라인은 새로 추가된 라인
- 파란 라인은 수정 된 라인
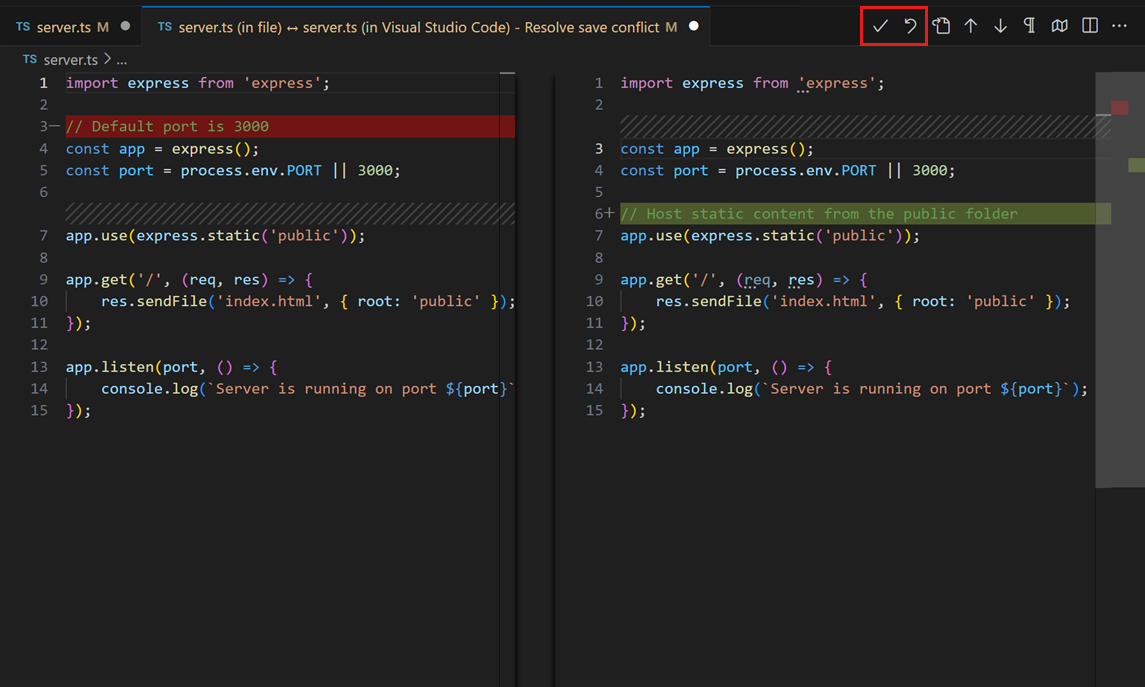
Resolve merge conflicts
Source Control 화면(⌃⇧G)의 diff 뷰에서 수정
Set VS Code as default merge tool
git config --global merge.tool code
Debugging
Configure debugger
Command Palette (⇧⌘P)를 열고 Debug: Open launch.json을 선택. 프로젝트에 맞는 환경(Node.js, Python, C++ 등)을 고르라고 함. 선택하면 launch.json 파일을 생성. Node.js 지원은 built-in 되어 있고, 다른 환경들은 알맞은 언어 extension을 받아야 함.

Breakpoints and stepping through
숫자 옆에 breakpoint를 지시 할 수 있음.

Data inspection
콘솔의 Debug panel에서 변수들을 관찰 할 수 있음.

Inline values
"debug.inlineValues": true를 설정해서 디버거에서 변수값을 inline으로 볼 수 있음. 이 기능은 비용이 높아서 단계별 디버깅이 느려질 수 있음. 기본적으로 꺼져있음.
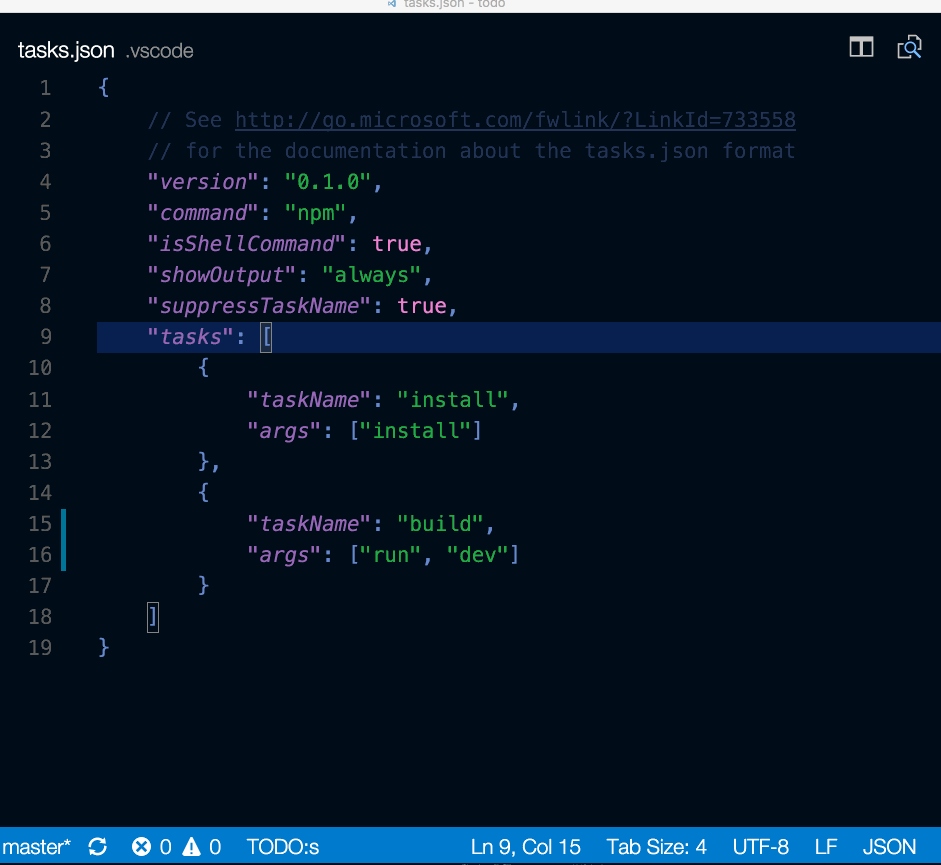
Task runner
Auto detect tasks
탑 레벨 메뉴의 Terminal을 선택하고 Configure Tasks를 실행. 실행하고 싶은 task를 선택. 아래와 같은 내용들로 tasks.json이 만들어진다.
{
  // See https://go.microsoft.com/fwlink/?LinkId=733558
  // for the documentation about the tasks.json format
  "version": "2.0.0",
  "tasks": [
      {
          "type": "npm",
          "script": "install",
          "group": {
              "kind": "build",
              "isDefault": true
          }
      }
  ]
}
Run tasks from the Terminal menu
탑 레벨 메뉴의 Terminal을 선택하고 Run Tasks를 실행. 실행하고 싶은 task를 선택. Terminate Task를 하면 종료.
Define keyboard shortcuts for tasks
어떤 task라도 단축키를 지정 가능. Command Palette (⇧⌘P)에서 Preferences: Open Keyboard Shortcuts File 선택. 원하는 숏컷을 workbench.action.tasks.runTask 명령에 바인딩 시키고 Task를 args로 정의
예를 들어, Ctrl+H를 Run tests 태스크에 바인딩:
{
    "key": "ctrl+h",
    "command": "workbench.action.tasks.runTask",
    "args": "Run tests"
}
Run npm scripts as tasks from the explorer
npm.enableScriptExplorer 설정으로 workspace에 정의한 스크립트를 보여주는 explorer를 활성화 할 수 있음
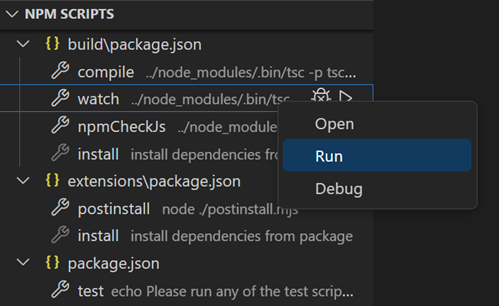
explorer를 이용해 에디터에 스크립트를 열거나, 노드 디버거(스크립트가 --inspect-brk와 같은 디버그 옵션이 정의되었을 때)로 실행. 클릭할 때의 기본 동작은 스크립트를 여는 것. 한번의 클릭으로 스크립트를 실행하려면 npm.scriptExplorerAction 설정을 “run”으로 바꿈. npm.exclude 설정으로 package.json의 스크립트를 exclude 할 수 있음.
Portable mode
VS Code는 Portable mode를 지원해서 설정과 데이터를 설치 할 떄와 같은 위치에 저장해 둘 수 있음. 예를 들면, USB 드라이브와 같은.
Insiders builds
Visual Code 팀은 버그 수정과 최신 기능 테스트를 위해 Insiders version을 사용. 고객 역시 여기서 써볼 수 있음.
Subscribe via RSS